

How To Set Up A Monitor Mixer
Stage monitors are critical components in a live sound system setup. The reason is because that's how singers and musicians can hear the mix to have a reference. Nowadays, in-ear monitors are gaining popularity, but they are expensive. Still, standard stage monitors play an important role, and they are much cheaper than in-ear monitors.
In this post, I'll explain how to set up stage monitors so that you can correctly place them in the stage and know how to set up the mix that's going to it. Let's get started.
Table of Contents
- Placement, the Most Important Aspect
- What to Choose, Active or Passive Monitors
- Setting Up the Monitors
- Creating the Monitor Mix
- Using Aux Sends for Monitors
- Setting Up and Creating a Monitor Mix Using Aux Sends
Placement, the Most Important Aspect
When setting up monitors around the stage, the first thing you need to address is where to place them. If placed in the wrong position or at an angle diagonal to the microphones, you will get a lot of feedback, and it will be a nightmare to control the audio.
To choose the monitor's right position on the stage, you need to know the polar pattern of the microphones that are going to be used, and you'll choose placement accordingly.
For example, the most common stage microphone in the world is the Shure SM58. It is a dynamic microphone with a cardioid polar pattern. A cardioid polar pattern is most sensitive in the front and less sensitive in the back.
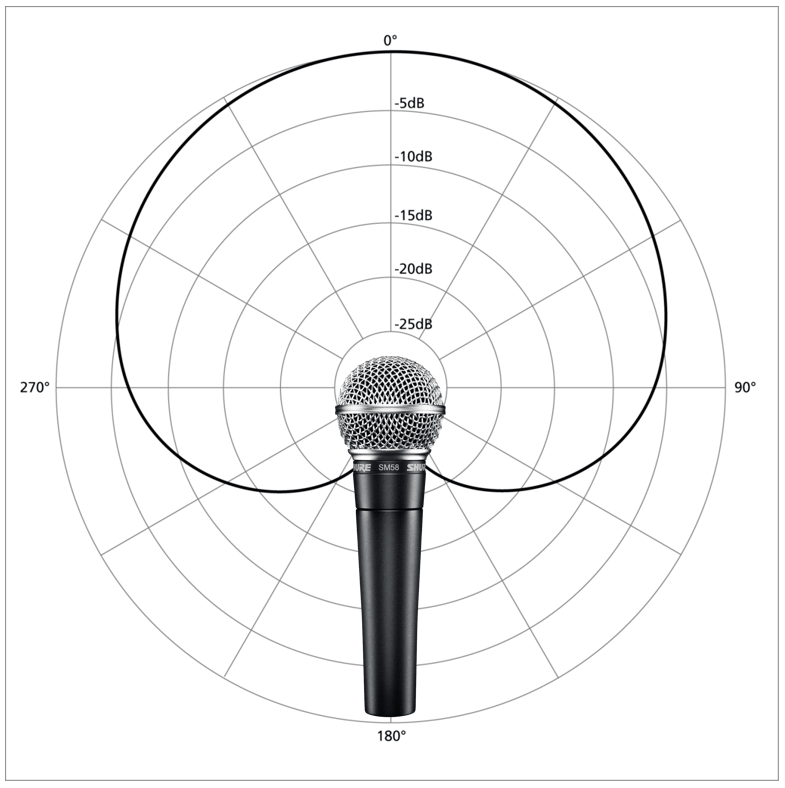
This reason makes it ideal for live stages where there is some noise in the background. It has a 131-degree coverage angle and 33% ambient sound sensitivity. The SM58 and most dynamic cardioid mics are less prone to feedback due to these characteristics.
Knowing this information about the mic allows you to make the right decision about where to place it on the stage. Being that a cardioid mic is less sensitive in the back, place the monitor right behind the microphone. Leave a distance between 3 to 5 feet between the monitor and the microphone's stand.
If instead of a cardioid polar pattern, you use a super-cardioid or hyper-cardioid polar pattern, the placement of the monitor will be different. Take a look at the polar pattern of both mics in the picture below and you will see that they can pick up sound from the back.
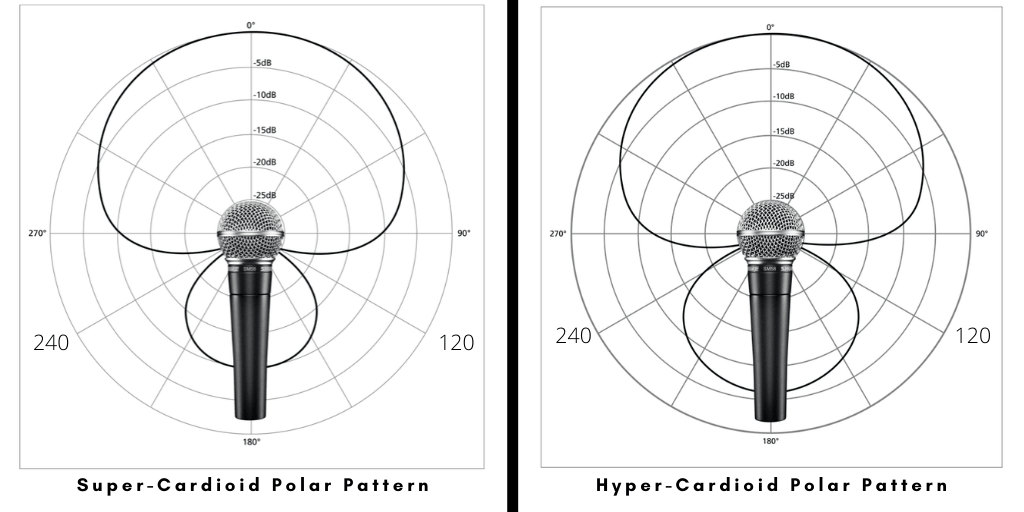
These types of microphones have a deaf spot at 120 and 240 degrees. By placing the monitor in any of these positions would work perfectly fine and greatly reduce feedback. To learn all about polar patterns make sure to read this post.
Another essential thing to keep in mind is to place the monitor as close as possible to each performer or group of performers. That way, you don't have to increase the volume as much for the performers to hear the mix, which will help reduce and control feedback.
What to Choose, Active or Passive Monitors
When shopping around for stage monitors, you have two options, active or passive. As you may know, an active monitor comes with its amplifier and volume controls. It needs to be plugged into a power outlet to feed the amplifier inside. It requires a cable from the mixer with the signal to be connected to it.
On the other hand, a passive monitor doesn't have an amplifier inside, meaning it would need to be connected to an amplifier for it to sound. This type of setup requires a connection from the mixer to the amplifier and then to the speaker. It's not as convenient as active monitors.
If possible, stick to active monitors; they are easier to set up and deliver excellent results.
Setting Up the Monitors
Now that you know how to place the monitors on the stage correctly, it's time to connect everything and feed a signal to them from the mixing console. I am assuming that you are using active monitors.
To set up the stage, monitors follow these steps:
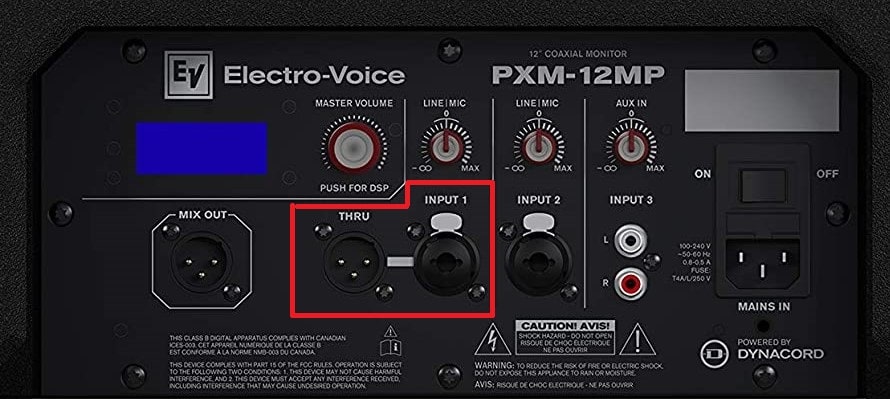
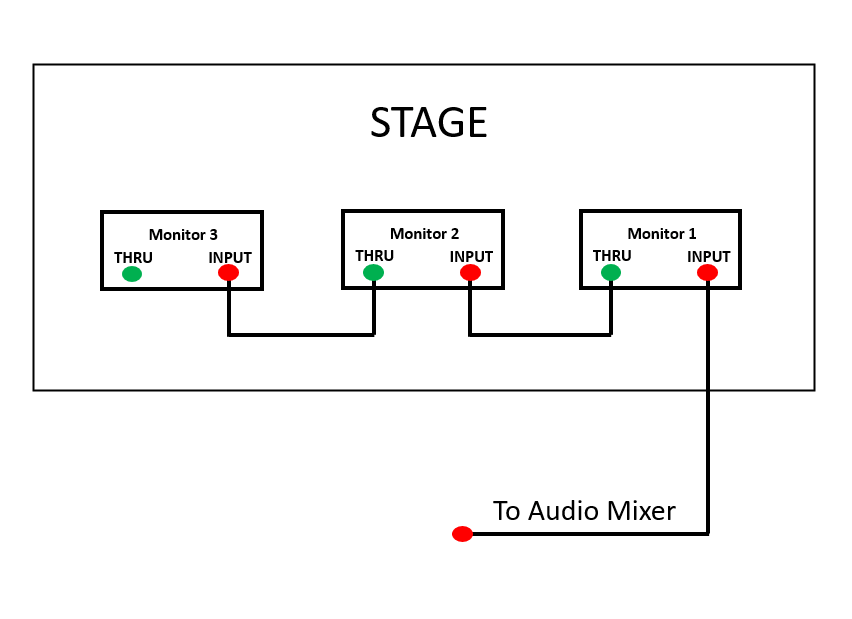
1. After surveying the stage and deciding where to place the monitors, connect them in daisy chain form so that the same signal coming from the audio mixer is fed to each one. To daisy chain monitors, locate the "Input" and "Thru" connectors. Use the image below for your reference.
2. Before you continue, make sure that the active monitors are off, and the volume knob is all the way down. Locate the monitor closer to the audio mixer, take a cable, and connect one side of it to the connector labeled "THRU." The other side of the cable plug it in the next speaker in the connector labeled "INPUT." Use the diagram below for your reference.
3. In the audio mixer, locate the "Monitor Out" or "Monitor Send" connector and plug the cable that is going to be sending the signal to the monitors. These could be different depending on the mixer you are using. Here is a couple of images that should help you locate the monitor out connector.
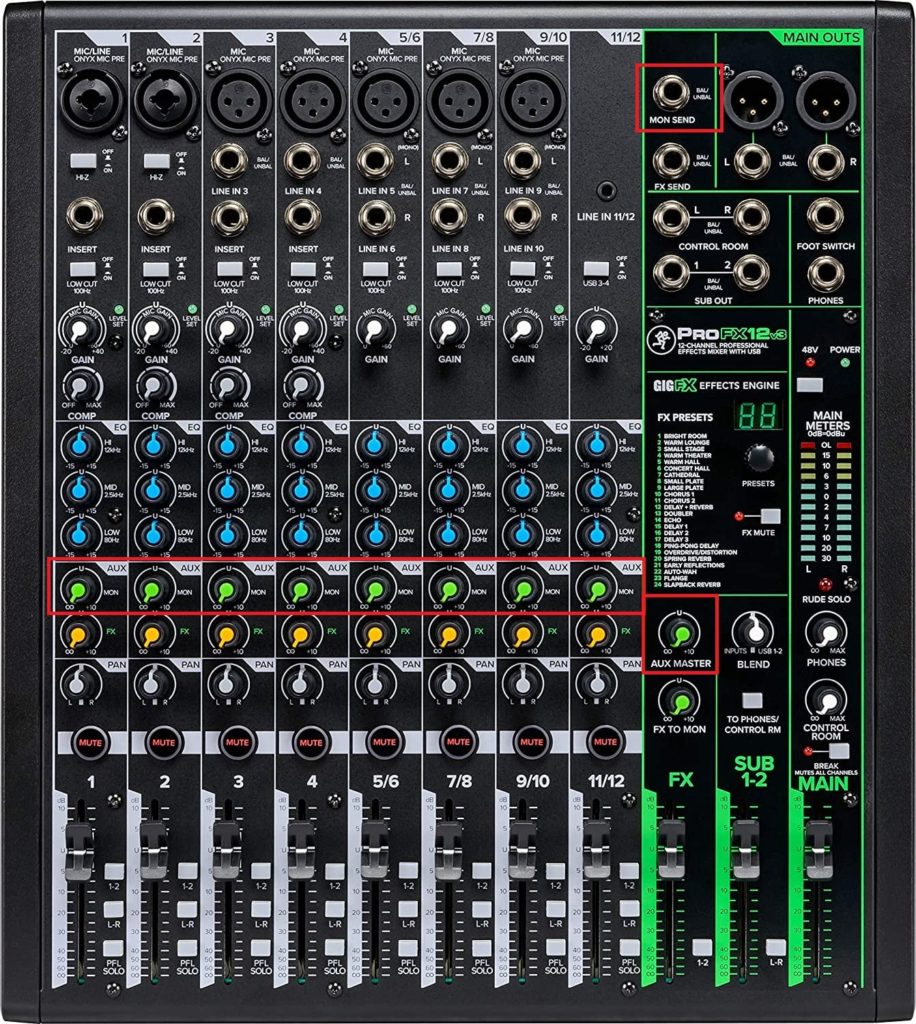

4. After everything is connected, make sure there is no audio playing through the mixer, and turn on all the monitors connected in the daisy chain. Increase their volume halfway, and if they have equalization knobs, set the EQ to a neutral position.
5. Go back to the mixer and play audio through the system and increase the corresponding volume knobs until you start hearing sound coming out of the monitors in the stage. In the image above, I have circled in red the corresponding volume knobs that need to be used.
Creating the Monitor Mix
Up to this point, we have discussed how to correctly place the monitors, connect them to the mixer, and test them to make sure that there is audio playing through them. It is time to create the monitor mix explicitly adjusted to the singers and performers on stage so that they get the best audio reference for the performance. My recommendation is to have all the singers and musicians go on stage and start performing for the soundcheck.
To create the monitor mix, follow these steps:
- To start, disable the main PA speakers so that audio only comes out from the monitors. That way, the sound technician doesn't get confused from the reflected sound coming out of the main speakers.
- Each channel has its monitor volume knob so that you can adjust it to the needed level (Monitor knob is highlighted in red in the image above). Use a pair of headphones connected to the mixer so that you can listen to the mix and adjust accordingly until you get a balanced sound from all the input sources. Some mixers allow you to route the monitor sound feed to the headphones. If that option is not available in your console, listen to the sound coming from the main mix, but using headphones to adjust more accurately.
- Once you are satisfied with the sound that you hear through the headphones, enable the main speakers again and set the volume to where you want it to be. This step is essential so that you rule out any feedback loop.
- After the main speakers and monitors are sounding, walk on stage and hear the level coming from the monitors and judge if the volume is too low or too high and adjust accordingly.
- If you like the sounds as the sound technician, ask the performers and musicians what they think, and make sure to ask them if they can hear themselves. You will get feedback from them and make minor adjustments to the EQ or volume level. Have them perform again and let them critic your setup, especially the volume and EQ of the monitors.
Using Aux Sends for Monitors
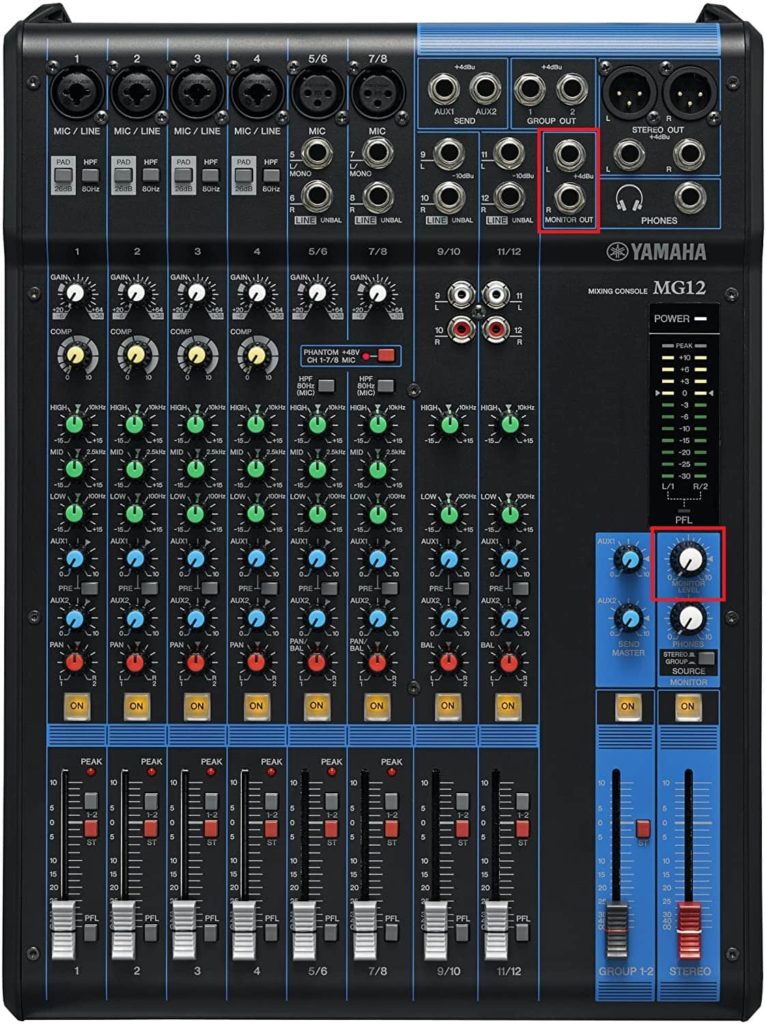
There are audio mixers that don't have an independent monitor output. Such an example is the mixer in the image below. Instead of having a dedicated monitor control per channel strip, it has several AUX sends that can be used for creating different monitor mixes.
The image below is of a Yamaha MG166XU. As you can see in the highlighted yellow area, there are three AUX sends. If needed, you could create up to three independent monitor mixes. One can be only for the vocalists; the other can be only for the guitars, and so on.
If you look closely, you will see that AUX 1 is also labeled "Pre" and AUX 2 has a switch to activate the "Pre" function.
In case you didn't know, "Pre" means pre-fader, which means that the audio signal from the channel strip is taken before the channel fader. So, there will still be a signal sent to the aux bus when the channel fader is down. That way, the audio signal is completely independent of the main fader.
You need to be careful because if you turn the fader all the way down thinking that no audio is going out of the mixer, but the AUX Send Master Volume is up, there will be a signal going to whatever is connected to the Aux Sends.

Setting Up and Creating a Monitor Mix Using Aux Sends
To create the monitor mix using Aux Sends, follow these steps:
- Firstly, make sure that all the equipment is turned off before connecting anything.
- In the audio mixer, locate the SEND OUTPUT connectors. They are usually found in the upper right corner or at the back of the mixing console.
- Connect the corresponding cable from the SEND OUTPUT to the INPUT of the first monitor. Then daisy chain the rest of the monitors that are part of this monitor mix.
- Turn on all the equipment but make sure to disable the main PA speakers so that audio only comes out from the monitors. You don't want to have sound coming out of the front-of-house speakers confusing you while you set up monitors on stage.
- Each channel strip has its AUX volume knob so that you can adjust it to the needed level. There is also an AUX SEND MASTER VOLUME for each aux bus. They can be located somewhere in the lower right area of the console. Check the image above to use it as a reference to find it.
- Have the musicians play while you set up the mix. Adjust each level to get a well-balanced sound coming out of the monitors.
- Once you and the musicians are satisfied with the sound coming out of the monitors, enable the main speakers again and set the volume to where you want it to be. This step is essential so that you rule out any feedback loop.
- After the main speakers and monitors are sounding, walk on stage and hear the level coming from the monitors and judge if the volume is too low or too high and adjust accordingly. Make sure to ask the musicians on stage if the monitor setup works for them and adjust accordingly.
Remember, it is vital to have all the performers pleased with the sound coming from the monitors because this is the only way for them to get a reference for the music during the performance.
There will be cases in which you would have to relocate the monitor or increase the volume of one channel strip more than others. Fortunately, the signal sent to the monitors is a separate signal from the one going to the main speakers. That way, you have complete control of the volume level going to each one.
That's it you have successfully set up stage monitors, make sure to adjust the volume to a comfortable level, and ask the singers and performers if they like the sound coming out of the monitors.
How To Set Up A Monitor Mixer
Source: https://virtuosocentral.com/how-to-set-up-stage-monitors/
Posted by: richardsonandled.blogspot.com
0 Response to "How To Set Up A Monitor Mixer"
Post a Comment